Showing posts with label Halloween. Show all posts

Monday, October 29, 2012

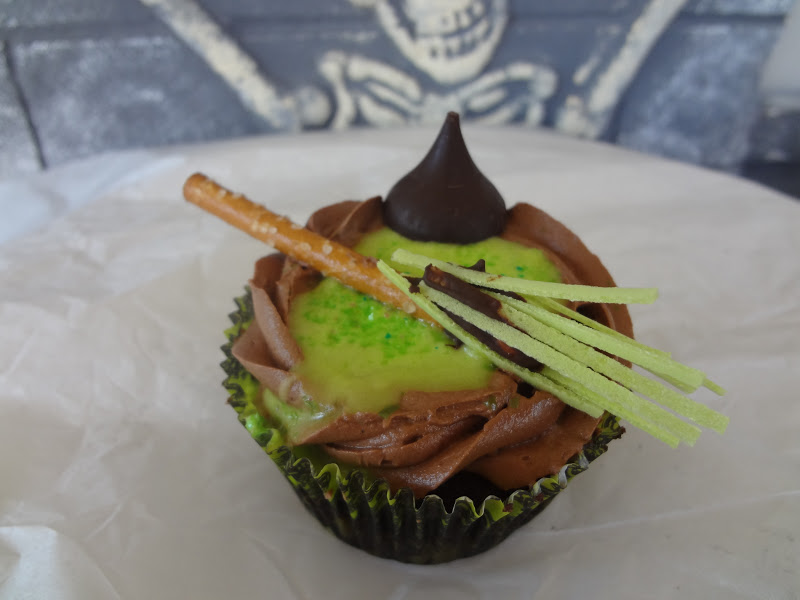
Melted Witch Cupcakes

I made these cupcakes over the weekend. People still watch the old "Wizard of Oz" movie, right? Because what with the "Wicked" musical being so popular, the kids these days might not want to eat a melted Elphaba cupcake (she being merely misunderstood rather than truly wicked).

I wanted to make these gluten-free so I ended up using a mix (Betty Crocker - it was pretty good, not dry like some gf mixes I've tried). I used my easy chocolate buttercream recipe for the frosting  - cream together two sticks of butter, 2-3 cups powdered sugar, 1/2 cup melted chocolate, a tablespoon of cocoa powder and a pinch of salt).

The witch cupcakes I've seen have used a Fudge Stripe cookie for the brim of the witches hat, but the scale wouldn't have been right for these cookies. I didn't have a smaller cookie (you'd need one that's slightly bigger than a quarter) so decided to just put the Hershey's kisses in for the hat, with no brim.

I wanted the witch to look truly "melted" so made a flat icing (whisk together a cup of powdered sugar, 2-3 tablespoons of cream or half and half and vanilla extract to taste. Add food coloring.)  I smoothed out the top of each cupcake a little and poured a little puddle of witch on each one.

The broom is made of a pretzel for the broom handle and some edible grass I got at Easter. I realize that not everyone has the forethought to get candy at Easter to use for Halloween (Ha! Just kidding - I bought it thinking that I could do something with it but not having any idea what) so you could use fruit roll-ups cut into strips or licorice. The "broom bristles" are attached with melted chocolate. I set them on wax paper until the chocolate was set.

Sunday, November 6, 2011

Jack-O'-Lanterns - A Few Days Later

Here are our jack-o'-lanterns a couple days after Halloween (my sister's above and mine below). Since they were scary faces to begin with, I think they've improved with age! I thought about leaving them out there to become really gnarly but I guess it's time to move on. I'm sad that Halloween is over for another year but on to Thanksgiving and Christmas!

Friday, October 7, 2011

Pumpkin Carrot Spice Cupcakes with Cinnamon Cream Cheese Frosting


BOO!


Happy October!

Yay, October has arrived! This is my favorite time of year - leaves are changing, cheery orange pumpkins are everywhere, it's hoodie weather (well, not here - it's been in the 80's! in Minnesota!), and, at the very end of the month, is the frosting on October's cake - Halloween!

Anywho, I love pumpkin anything and have been pondering these cupcakes for a while. We got a bunch of carrots in our CSA box last week, too, so it seemed like this might be a good way to use some up!

I used the recipe from here, and modified it slightly:

http://www.womansday.com/Recipes/Pumpkin-Carrot-Cake-with-Cream-Cheese-Frosting-Recipe.html

I also made cupcakes instead of cake, so the baking time is much quicker! It makes about 2 1/2 dozen cupcakes.

Ingredients
3 cups flour
2 tsp baking powder
1 tsp salt
1/2 tsp baking soda
1 tsp cinnamon *note* you can use pumpkin pie spice, as the recipe suggests. I just never have any around
1 tsp ginger
1/4 tsp nutmeg
1/4 tsp clove

3 large eggs
3/4 cup granulated sugar
3/4 light brown sugar
1 can pumpkin (15 oz)
1/4 cup whole milk
1/2 tsp orange zest
2 tsp vanilla extract
2 medium carrots, grated (about 1 cup) *note* the original recipe says "coarsely grated" but I would grate them pretty fine unless you want pumpkin cupcakes with just the occasional big chunk of carrot

Directions:

1. Preheat oven to 350 (I preheated mine to 325 because it is always way hotter than it is supposed to be. You know your oven best, so if you have a decent oven and not a crappy rental kitchen oven then go for 350).
2. Make sure eggs and milk are at room temp. This makes a big difference in the end product. You can place the eggs in a bowl of warm water for 5-10 minutes and that should do the trick. For the milk, I used dehydrated powdered milk so just added warm (not hot!) water to it. For regular milk, you can microwave it a little bit to get it to lukewarm.
3. Place all dry ingredients (listed at the beginning, exclude the sugar) in a large mixing bowl and mix together with a whisk until well-combined.
4. In another mixing bowl, combine the rest of the ingredients. When well-combined, pour wet into the dry ingredients and mix until just combined. That means that there aren't any pockets of dry ingredients (make sure to stir up the bottom) but it will still be a little lumpy. Don't overmix!
5. Fill cupcake liners a little more than half full and pop 'em in the oven. Bake about 12-15 minutes or until toothpick inserted in center comes out clean (no goo and no crumbs).
6. Let cool completely before frosting.

Frosting Recipe
2 blocks of cream cheese (8 oz each) (I used Neufchatel because it's lower in fat but whatevs)
1 stick of butter
powdered sugar (start with a cup)
1/2 tsp vanilla extract
1 tsp cinnamon (or to taste)

1. Soften butter and cream cheese in the microwave. Be careful not melt them, though!
2. Use paddle to mix in stand mixer or mix on low with hand mixer. This is not a "fluffy" frosting so you don't want to incorporate too much air.
3. Once butter/cream cheese mixture is lump-free, start adding the powdered sugar. Mix on low or you will have a cloud of sugar in your kitchen! Keep adding sugar until you reach a good balance of consistency/sweetness. The sugar helps make the frosting less gooey but it also (obviously) adds sweetness so you don't want to lose the tanginess of your cream cheese.
4. Add cinnamon and vanilla to taste and mix until incorporated.

Tuesday, October 5, 2010

All Hallow's Eve is coming - bwa-ha-ha-ha!

Here is an easy and spooky project over at Martha Stewart Living:
http://www.marthastewart.com/article/glow-stick-spider

Here are some links to some Halloween blogs I've recently discovered. They have some great ideas for spooky props!

http://davelowe.blogspot.com/

http://www.stolloween.com/

http://www.pumpkinrot.com/

Saturday, November 7, 2009

Halloween How-To: Decorations

As promised, here's a little more about my Halloween projects for 2009. The above is a pic of the bar - set up with a black light ($12 at Target), some cheap glow-in-the-dark skeletons and spiders (from the Dollar Store) and some carefully arranged tonic water (did you know the quinine in it makes it glow eerily under a black light? Apparently, a lot of people did know but it's news to me).

Above is the crazy Halloween headress that I made with a headband, silver ribbon with wire, scraps of purple fabric, and cheap plastic critters from the dollar store (painted with silver craft paint). I used safety pins to put it together so it easily came apart and didn't damage the head band.
I call this look "fun with spiders". The big spider in the middle is crumpled newspaper, taped into a ball with packing tape and covered with crepe paper. The web is more crepe paper and the baby spiders were cut from black construction paper and taped all around the room.
The coffin decoration is admittedly rustic looking but was mostly a way to try to cover the two tall bookshelves in the living room. My books are too colorful and cozily cluttered-looking to be spooky. I cut the coffin shape from cardboard and used low-odor spray paint to paint them black. I added the "R.I.P." because I wasn't sure you could tell it was supposed to be a coffin; I know that coffins typically don't have RIP on them but I think it worked.
This spooky wreath cost very little to make. I bought a weird straw wreath at a thrift store for a buck and covered it with black crepe paper streamer. You could used a foam wreath or buy one of those cool black wreathes made especially for Halloween. A little bit of spooky ribbon, some fake flowers in appropriate colors, a plastic skull from the dollar store, an old necklace, and some fake cobwebs complete the look. I did use hot glue to affix the skull to the crepe paper but everything could be removed easily, if I wanted to re-use the wreath for another purpose.
Above is our homemade mummy (serving as the warden here, to Melanie's prisoner garb at work). He was made out of crumpled newspaper balls (for the head, chest, and hips) connected together (more packing tape) with cardboard tubes from rolls of gift wrap (I knew they would come in handy some day!) for the arms, legs, and spine. Melanie worked hard to wrap him in white crepe paper and misted him with a very diluted mix of water and brown paint to give him an authentic ancient look.

I think this one above is my favorite project. I found the frame at a thrift store and knew I could do something creepy with it. I stained the wood with silver acrylic and printed some creepy pictures off the web. Voila! Sometimes you just have to be on the look out for strange items and used your imagination to make them fit your theme!

Wednesday, November 4, 2009

Halloween How-To: Food Edition

We made sure to have plenty of treats for our guests at our Halloween get-together this year. Included were the peanut butter eyeballs pictured above. The filling is PB and confectioner's sugar, rolled into a ball and dipped in vanilla candy coating. The eyeball is black frosting with lines of red gel frosting. Next time I will make the PB filling less sweet since the coating is super sweet and I will make the pupil from chocolate rather than nasty black frosting. Oh well.

Here'a pic of the treat bags we gave out. They are from Martha's Halloween line and appropriately creepy. Inside are wind-up vampire teeth, body organ gummies and chocolate body parts (all from Oriental Trading). You can see some of the candy in the photo below.

I made these creepy "frog eggs" from Tapioca, using the instructions from here:
We put out glow sticks for stirrers, which added to the look.
This is a terrible picture but I also made Red Velvet cupcakes with cream cheese frosting. I made the cake from a mix and the batter was, indeed, blood red. Silver sprinkles completed the look.
Here are some other things that we served that I don't have pictures of:
Bacon-wrapped Squash Bites from here: www.chow.com/recipes/27760
Pesto dip: garbanzo beans, pesto, and parmesan cheese
Chocolate cookies: made from the recipe on a box of Duncan Hines chocolate cake mix. No joke. They are awesome!
Pumpkin Dip: Canned pumpkin mixed with softened cream cheese and cinnamon. Serve with Nilla Wafers or ginger cookies.

Thursday, September 17, 2009

Halloween Giveaway!

*************The giveaway has been extended until Wednesday since there haven't been 30 posts. Tell your friends!***************************************
Okay, as promised (although a day late!) I'm having the first giveaway on my blog. Pictured above is the Halloween goodies that will go to the winner. Included:


  • Halloween Stickers
  • A skull ice cube tray
  • A cool black metal notebook
  • A 3-D Halloween card
  • Spooky bottle stickers
  • Skeleton platter
  • Halloween colored pencils
  • A copy of Country Living's Halloween book

In addition the winner will get a hand-crafted owl ornament made by me. I posted a picture of a similar ornament below. I haven't quite finished the actual ornament for the giveaway.

How to Enter: In the comment section, tell me about your favorite Halloween costume of all time (either your own or someone elses). If I have comments from 30 people by next Friday, I will randomly draw a name as the winner. So, please forward to your friends who may be interested in this blog.


Good Luck!!!!!!!!!!!!!!!

Tuesday, September 8, 2009

Halloween is right around the corner

Oh, okay- I know Halloween is still almost two months away. And I love September so I'm not trying to rush it. BUT.....I love Halloween. It's such a great time for creative, crafty types. Here are some awesome Halloween ideas/decorations I found around the web:

Above: Halloween stencils on www.fancyflours.com. They also have a ton of cute picks and sprinkles.

Below: Creepcakes by Martha Stewart. It would be a fun activity with a kid, wouldn't it?


Above we have some cute mummy pops from Oriental Trading....

....and here we have some awesome vintage-looking Halloween cards from Plum Party.


Or maybe you like your Halloween stuff on the gory side? No problem. Above is a candy blood treat from Oriental Trading, and below is a drink dispenser from www.spirithalloween.com


I like my Halloween cute or atleast cheesy-scary (not really scary, though. I hate those Scream costumes). The ornaments above are also from Plum Party.

And finally, here is a cool decorating idea from Country Living. Just creepy enought, right?

Sunday, November 2, 2008

Halloween 2008

Here is my jack o'lantern above. I decided to go for something creepy with a lot of teeth, this year! Below is Melanie's cute owl; it looks really cool all lit up!


Here is a picture of the treat bags that Melanie and I made this year. I hope you can tell that they are supposed to be witches' brooms! I got the idea from Martha Stewart and adapted it a little for those of us who aren't quite as skilled as Martha.
Below is Melanie's Halloween cake, complete with skeletons haunting the cemetary.