Wednesday, October 31, 2012

Steampunk(ish) Costume


This year some of us decided to go "Steampunk" for Halloween. I don't know if I would say my costume is really authentic Steampunk (which is funny to say since it is a sort of made up time period) but I was pretty happy with the way it turned out. I am supposed to be a Steampunk Entymologist (bug scientist).

We did a little photo shoot at an abandoned building that had a kinda Old West facade. It used to be an antique store, I think, but it's falling apart now. You can see more of my costume here. My mom added the puffed sleeves to my shirt but most everything else I just bought at the thrift store. I made the "cincher" corset-type-thing from a paper bag and gold duct tape.
Here's a better picture of my hat. I made the form out of cardboard and covered it in wrinkly paper bag. Then I painted it, added some faux-leather trim, some packing tape with an insect pattern (found at Target in the office supply section) and some plastic insects I had "antiqued" with black and gold paint.
Below is a picture of my sister's costume, from the back. She's lucky because her hair looks cool without having to wear a wig! Isn't the tree awesome?
Here's a action shot of my brother-in-law above and one of my sister (Ma Barker style) below.

Skull Jack-o'-lantern


Happy Halloween!

Hope everyone is enjoying a spooky good time. The moon is full so watch out for wicked witches, werewolves, and goblins of unusual size (GOUSes)

Here is my jack-o-lantern design for this year. I decided to do a mosaic-type thing with the pumpkin and pieces of another squash (Carnival, is the name). It's a little "Day of the Dead" so I'm happy with it.

Monday, October 29, 2012

Melted Witch Cupcakes

I made these cupcakes over the weekend. People still watch the old "Wizard of Oz" movie, right? Because what with the "Wicked" musical being so popular, the kids these days might not want to eat a melted Elphaba cupcake (she being merely misunderstood rather than truly wicked).

I wanted to make these gluten-free so I ended up using a mix (Betty Crocker - it was pretty good, not dry like some gf mixes I've tried). I used my easy chocolate buttercream recipe for the frosting  - cream together two sticks of butter, 2-3 cups powdered sugar, 1/2 cup melted chocolate, a tablespoon of cocoa powder and a pinch of salt).

The witch cupcakes I've seen have used a Fudge Stripe cookie for the brim of the witches hat, but the scale wouldn't have been right for these cookies. I didn't have a smaller cookie (you'd need one that's slightly bigger than a quarter) so decided to just put the Hershey's kisses in for the hat, with no brim.

I wanted the witch to look truly "melted" so made a flat icing (whisk together a cup of powdered sugar, 2-3 tablespoons of cream or half and half and vanilla extract to taste. Add food coloring.)  I smoothed out the top of each cupcake a little and poured a little puddle of witch on each one.

The broom is made of a pretzel for the broom handle and some edible grass I got at Easter. I realize that not everyone has the forethought to get candy at Easter to use for Halloween (Ha! Just kidding - I bought it thinking that I could do something with it but not having any idea what) so you could use fruit roll-ups cut into strips or licorice. The "broom bristles" are attached with melted chocolate. I set them on wax paper until the chocolate was set.

Sunday, October 28, 2012

Halloween Links!

Here's a photo of the ghost cupcakes I made last year. These are pretty easy - a dollop of frosting with chocolate chip eyes. I sprinkled some sugar on them for sparkle but it ended up looking weird. I don't recommend it.
 Sorry for the lack of posts. I've been having technical (and other) difficulties. I WILL post thirteen Halloween posts but they may not be on thirteen different days. Here are some pics of my cupcakes I made last year, with some tips for making them. Also, some great Halloween links:

These are pretty easy. Frost the cupcakes as you normally would (I just put a big dollop of frosting on). Pour orange sprinkles in a bowl or on a sheet of wax paper and press the cupcake into the sprinkles. The faces are made with melted chocolate and the stems are just more buttercream.
For these festive swirls, I just put three different colors of frosting in my piping bag, trying to "stripe" them in but it doesn't really matter. You could also paint stripes on the inside of your bag with gel food coloring, which would give you a similar look.

Thursday, October 25, 2012

Gingerbread Cupcakes


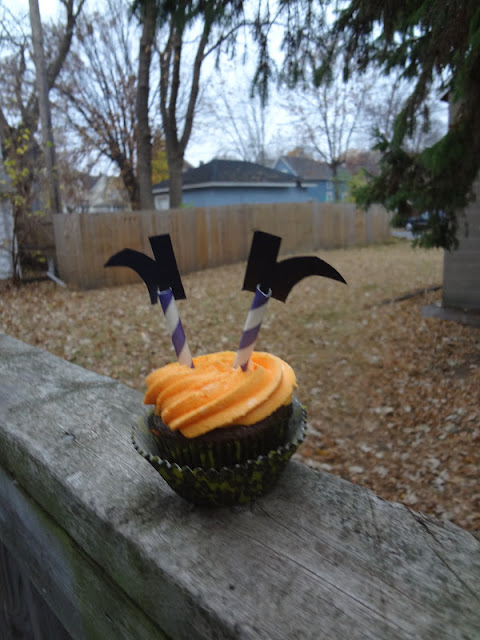
I've seen this cute decorating idea on several blogs lately. It turns out this upside-down witch cupcake is easy to make. You need paper straws, black construction paper and your favorite cupcake. Cut the straw in half (or thirds) and attach a black construction paper witch shoe to each half. You will need to make two slits in the "shoe" so that the middle part is about as wide as the inside of your straw. That way you can just pop the shoes on and stick your straw "legs" into your cupcake.

 Gingerbread Cupcakes Recipe

Ingredients:
  • 2 1/4 cups all-purpose flour
  • 1/2 tsp baking soda
  • 2 tsp ground ginger
  • 1 tsp cinnamon
  • 1/2 tsp cloves
  • 1/2 tsp nutmeg
  • 1/2 tsp allspice
  • 1 tsp cocoa (dutch-processed preferred)
  • 1/2 tsp salt
  • 1 cup butter, melted and cooled
  • 3/4 cup molasses
  • 3/4 cup sugar
  • 1 cup buttermilk
  • 1 large egg
To Make:

1. Preheat oven to 350F.
2. Sift/mix dry ingredients (except salt) in a mixing bowl. Set aside.
3. Mix last six ingredients together until well-combined.
4. Add dry ingredients to wet, a third at a time and mix on low speed until just mixed (no dry spots but it may be somewhat lumpy - that's okay).
5. Fill cupcake cups about half full. Bake 15-25 minutes or  until toothpick comes out clean.

Easy Orange Frosting

3 cups powdered sugar
2 sticks of butter, softened
1 tsp orange extract or orange zest
pinch of salt

To Make:

1. Cream Butter and 1/3 of powdered sugar until very fluffy.
2. Add salt and orange extract
3. Add remaining sugar or until you get the consistency and flavor that you want. If it gets too thick, add a teaspoon of milk or cream.

Tuesday, October 23, 2012

Barebones Halloween Extravaganza


This year is the 19th Annual Barebones Halloween Extravaganza. Each year, a large group of artists, dancers, puppeteers, musicians and lots and lots of other volunteers put on a show around Halloween. I have been meaning to get to one of these shows for years now and am so excited that we decided to go last Sunday (when it was warm!)  It did not disappoint! You can expect to see fire-eaters and dancers, really cool and huge puppets, dancing, aerialists, and lots of stuff that is cool but hard to categorize. If you enjoy the creative hippy vibe of the May Day Parade then this will be right up your alley.  

Seating is on the ground or on hay bales and its recommended that you dress for cold weather.  There are three shows left - this coming Saturday and Sunday evenings and one on Halloween - each show is followed by dancing to a local band and free food provided by Sisters Camelot. Suggested donation is $5-$20 but it is a pay-what-you-can type of event. Lots more info here: http://barebonespuppets.org/
The name of the show this year is "Chick-a-BOOM" and the narrative roughly follows the idea of the Big Bang and the cycle of creation and destruction, birth and death.
My sister took these pics during the show. It was hard to get good ones since it is a low-light environment.


Monday, October 22, 2012

Thirteen Days of Halloween

 I am going to be posting thirteen days of Halloween fun! Yes, this will bring us a little past Halloween so that I can do some recap post-holiday. Here are some drawings I did in Microsoft Paint!


Collaborative Creation 3 (Blue Woman)

Here is the final painting that Melanie and I worked on. Melanie drew this woman....
...and I added color with watercolor....
...and Melanie added the finishing details.

Friday, October 19, 2012

Collaborative Creation #2 (Landscape)

Here's another of the paintings Melanie and I worked on last weekend, I started with by laying the color for the background an drawing some plants in with crayon...
...then Melanie drew these trees and leaves...
and I added a wash of blue to the background and some brighter colors for the leaves...
and Melanie finished up by adding some more detail for the leaves and plants in colored pencil.


Thursday, October 18, 2012

Collaborative Creation (Monster!)

As I mentioned, my sister Melanie and I are the featured artists this month at Articulture's retail store: http://www.articulture.org/featured-artist

We did a painting demonstration last Saturday and worked on some pieces together. We've never done that before but it was lots of fun! Here is one of the pieces we did and the different stages.

I started the background (above) by laying down some bright splotches of color.


Melanie drew in this cute monster guy.........
.......and I finished up the background by adding some contrasting cool colors. What do you think? I think he looks great!

Wednesday, October 17, 2012

Kaleidoscope

Did you know there are different types of kaleidoscopes? I got this one at Target on clearance ($3.50) and have playing around with it. It's called a teleidoscope. Here is the definition of a teleidoscope according to this super informative website on kaleidoscopes:
"There is no endpiece containing color, only a clear lens that turns everything it is pointed toward into a kaleidoscopic image. It’s been said that the ultimate value of the teleidoscope is the potential each viewer has to see the artistic value in his own environment."

The website sells some beautiful kaleidoscopes in addition to giving the history of them. Here is a link to the part of the website that tells about the inventor, Sir David Brewster.
http://www.kaleidoscopesusa.com/about/sir-david-brewster/

I took these photos that show what you see looking through the lens. I thought they were pretty. They remind me of models of different viruses or bacteria or something under a miscroscope. They also slightly resemble photos from outerspace (nebulae and such).

What do you think?


Tuesday, October 16, 2012

Farmers Market in the City

Last Thursday I walked over to the farmers market on Nicollet Mall during my lunch. It was a beautiful, sunny day so I took a few pictures as I went. The market season is winding down. The farmers look cold, bundled up against the wind. There are piles of gourds, pumpkins and squash everywhere. There are still some cold weather crops like potatoes, onions, garlic, some apples, and brussel sprouts. Winter is definitely on its way. There are more people taking the skyway to escape the chill and fewer food trucks parked in front of our building.